Hi, we’re going to be looking at how you can design Bluetooth controlled scrolling text display using an Arduino board. The Arduino will make it possible to control the characters and timing of the scroll. You’ll need some basic knowledge of electronics and programming in order to complete this project. Let’s get started!
What is Arduino and what can it be used for
Arduino is an open-source electronics platform based on easy-to-use hardware and software. It’s used by people all over the world for a variety of purposes, from robotics and drones to home automation and environmental monitoring. Arduino can be used for a wide range of projects, from simple tasks like blinking an LED light to more complex ones like controlling a motor or a servo.
You will agree with me that for you to have texts scroll on the dot matrix display modules, you need to add the text you want to scroll on the DMD written in the Arduino code, and if you wish to change the texts, you have to reprogram the Arduino.
However, in this very tutorial, you will learn how to design a scrolling text display with Arduino, that can be controlled via Bluetooth using a smartphone.
What this means is that, if you want to change the texts that scroll on the DMD, you do not need to reprogram the digital scrolling text display by plugging it into the computer to reprogram, you only need to download and install the android application I made with MIT APP inventor, with the application, you can send texts to scroll on the DMD modules. This project has its benefits especially to businesses and establishments that display menus, instructions, and so on.
Materials for making Bluetooth scrolling text display
- Arduino board
- HC-05 Bluetooth module
- Three (3) P10 Dot matrix display modules (DMD)
- 5V power supply
- Flat Ribbon cables (FRC) also known as multi wire planar cables
- Jumper wires
- Arduino code for the design
- Android App for the design
- Breadboard
Circuit diagram of the Bluetooth controlled scrolling text
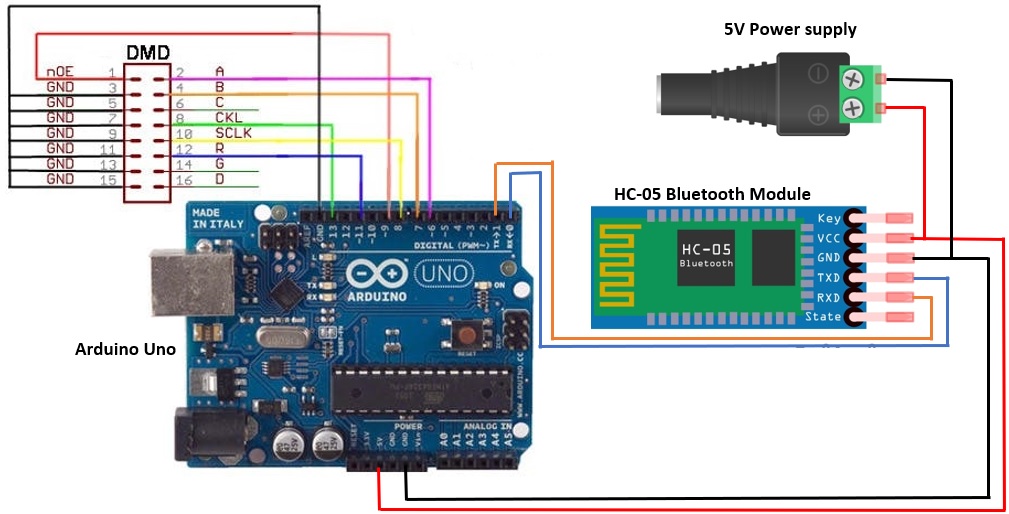
Connect the parts as shown in the circuit diagram above, the RXD pin of the Bluetooth is connected to the RX pin of the Arduino board which is pin0 of the Arduino, while the TXD pin of the Bluetooth is connected to the TX pin of the Arduino board which is pin1 of the Arduino board. However, these two pins should be disconnected prior to uploading the Arduino code, this is because the Arduino communicates with the computer via those two pins using the serial communication protocol. Also, remove the power supply connection from the connection, and connect back after uploading the code to the Arduino board and the Arduino board disconnected from the computer.
Arduino code
#include <SPI.h>
#include <DMD.h>
#include <TimerOne.h>
#include "SystemFont5x7.h"
#include "Arial_black_16.h"
#define DISPLAYS_ACROSS 3
#define DISPLAYS_DOWN 1

DMD dmd(DISPLAYS_ACROSS, DISPLAYS_DOWN);
#define max_char 100
char message[max_char];
char r_char;
byte index = 0;
int i;

void ScanDMD()
{
  dmd.scanDisplayBySPI();
}

void setup(void)
{
   Timer1.initialize( 5000 );
   Timer1.attachInterrupt( ScanDMD );

   dmd.clearScreen( true );
   Serial.begin(9600);
}
void loop(void)
{
   if(Serial.available()){
        for(i=0; i<99; i++){
            message[i] = '\0';
        }
        index=0;
    }
    while(Serial.available() > 0){
       if(index < (max_char-1))
       {
           r_char = Serial.read();
           message[index] = r_char;
           index++;
           message[index] = '\0';
       }
   }
   dmd.clearScreen( true );
   dmd.selectFont(Arial_Black_16);
   dmd.drawMarquee(message, max_char,(32*DISPLAYS_ACROSS)-1 ,0);
   long start=millis();
   long timer=start;
   boolean ret=false;
   while(!ret){
     if ((timer+30) < millis()) {
       ret=dmd.stepMarquee(-1,0);
       timer=millis();
     }
   }
}
If you do not have the various libraries already installed in the Arduino IDE and you don’t know how to go about that, read this tutorial on Arduino libraries.
Design Explanation of the Bluetooth controlled scrolling text
Open the Arduino IDE on your computer, copy and paste the code in an empty editor window in the IDE, plug the Arduino board to the computer, set up the board as required by selecting the board you are using and the com port. After everything is set, upload the code by clicking the upload button or ctrl U. Once the code is done uploading, unplug the Arduino board from the computer and connect back the TXD and RXD pins of the Bluetooth module to the TX and RX pins of the Arduino respectively, then connect back the power supply to the circuit as shown in figure one above. Once this is done, the Bluetooth module will start flashing, the next thing to do is to download and install the android application to control the design. Download the android application with the link below:
Once the app is downloaded, enable your smart phone to install the app, you need to allow your phone to do so. When you’ve installed the app, you will see the interface like this when you open the android application.
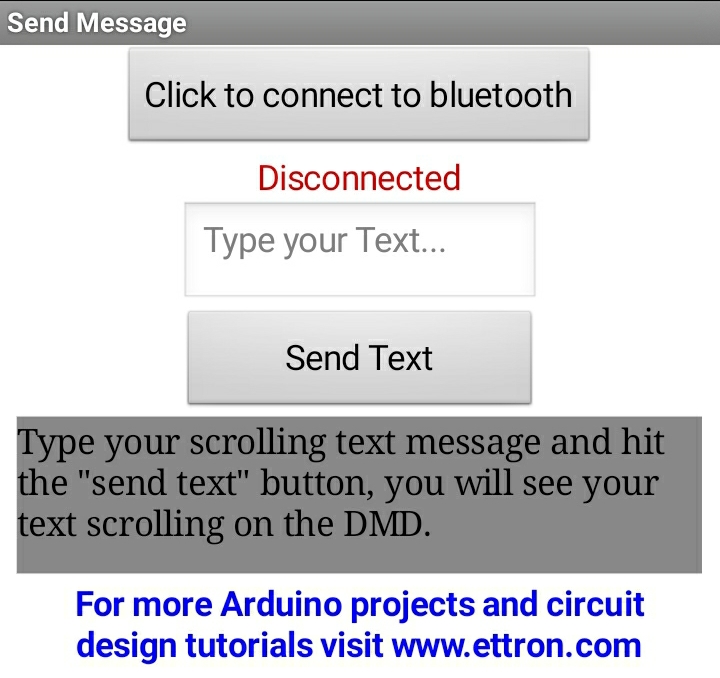
Click the button that says “click to connect to Bluetooth”, when you click it, it will bring out list of all the available and previously paired Bluetooth devices, amongst them you will see HC-05, click it and your device will pair with the HC-05 Bluetooth module and you will see “Connected” on the app and the Bluetooth module will stop flashing. Now you can send text to display on the DMD.
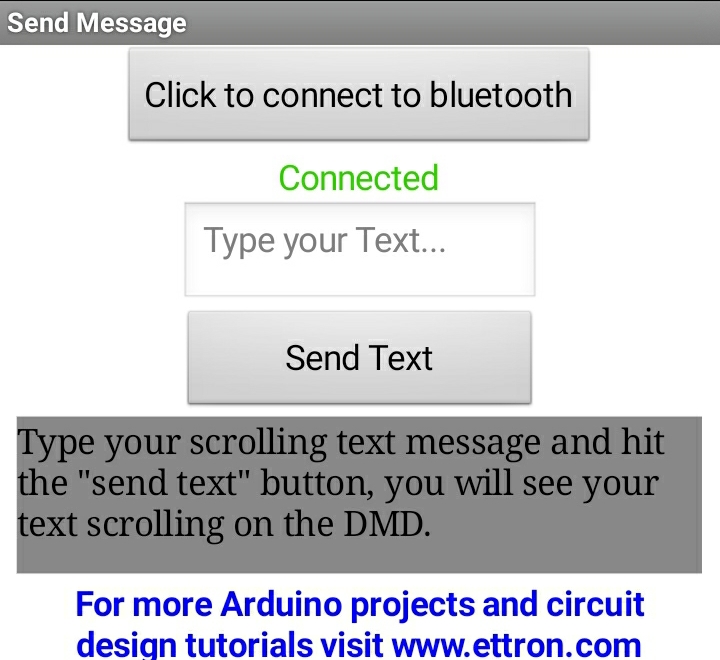
In the box that says “Type your text”, type in the information you want to scroll on the DMD and press the send button, automatically, the information will start scrolling on the DMD from right to left.
Watch the video tutorial here below.
Reference:
- Ettron.com – Bluetooth Controlled Scrolling Text Display with Arduino